Meet a few of my plants. I know this is silly but ever since I moved to Portland OR all I do in my free time is garden. I thought I’d share my other passion besides drawing. And They make great reference material. So feel free to draw them.
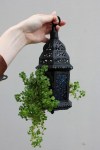
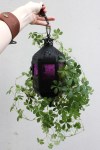
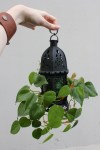
I love lanterns and I love plants so I combined them, the top three plants hang in my kitchen window. I removed some of the glass panels and added a screen fixing patch in their place so the plant could grow out of the windows and so it could contain the dirt.
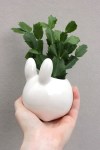
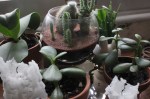
The bunny container is cute and new. I planted it around christmas. It sits on the kitchen table with two little jades, a few cactus and a orchid (the fifth picture). The bunny container is from amazon. Here is a link.
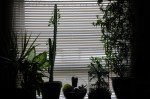
The sixth picture is of the plants in the bedroom window. The tall vine (pink jasmine) usually spends it’s time outside but I brought it in for the winter and it was very happy.
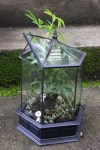
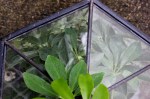
The last two picture are of my H potter Terrarium. Which is super happy and my Schefflera has quickly outgrown it’s container. I also put my kodama in there because I’m a nerd. I got the terrarium on amazon. Here is a link.
I leave the top part open most of the time, because the other terrarium I have from H potter the Barrel Roof edwardian case, Tends to get mold really fast. I still am getting used to dealing with plants in such a closed off environment and I have not mastered it yet. XD
I have a lot of other plants in my work space and in the bathroom, plus the ones outside and as spring begins to show up in full swing I will share more. 🙂
Step 1: Pick leaves Gently twist the leaf near the base, it should snap off the plant cleanly. Good cuttings will be slightly rounded at the ends, and have no ‘open’ wound:
Bad cuttings will not grow, you need to make sure the whole leaf comes off in one go. Bad leaves are jagged, torn, or cut:
Step 2: Lay all cuttings inside on a piece of cloth. I usually put a piece of old scrap material down on my desk and lie all the leaves out in rows. I try not to pile up the leaves, as this tends to promote rot. Do not water at all. AKA no misting the leaves, no watering the leaves, nothing. Everything the baby succulent needs to grow is stored in the mother leaf, watering may rot the leaf before the new plant is big enough to survive on its own! Make sure the leaves aren’t in direct sun, as they will wither before they form new plants. Filtered light from a window is strong enough!
Step 3: Waiting After about 4 weeks you will start to see the first signs of life. The leaf may send out roots first, it may start to grow with no roots. Both are okay!
Step 4: Planting (Start watering once a week at this stage) After 6-8 weeks the baby succulents will be big enough to plant outside! I do this by placing the leaves on top of loose, sandy soil that has not been compacted. I do not bother burying the leaves, as it tends to do more harm than good (you may snap roots/damage new shoots in the process):
I place all the plants together, they don’t really seem to mind! These is how they look after about 10 weeks:
When the plants are big enough, the mother leaf will shrivel up and start to die off:
TADA! You’ve created baby succulents 🙂
I’m sorry, this is a very beautifully illustrated, informative plant post, but every time I read “Make succulent babies” I put the emphasis on the wrong part of the phrase and expect something.. very… different.